 button and the Network Processes Screen will be displayed. On that screen find Placement Pro in the list of interfaces and click to select it. To access the interface, either double click on it in the list or highlight and click process.
 Placement Pro adds new accounts with the ability to import most fields including Regulation F fields in CollectMax at the same time. It allows for simple companionation rules and the import of most AIM Templates. If you have AIM and are using it as well as MaxUpdater to pull in placement files, this could be the module for you.
This is a Version 11 Feature and an optional module. For information about the purchase of Version 11 and the module, please contact Sales.
After installation, Placement Pro is accessed from the Interfaces screen. From the main screen of CollectMax, click the button and the Network Processes Screen will be displayed. On that screen find Placement Pro in the list of interfaces and click to select it. To access the interface, either double click on it in the list or highlight and click process.

The Add Accounts Tab is where import files are processed by selecting the template and the file and clicking process. This process does not work without creating templates like with AIM, MaxExtract and the MaxUpdater. The template must be created from an sample placement file or by importing an AIM Template.
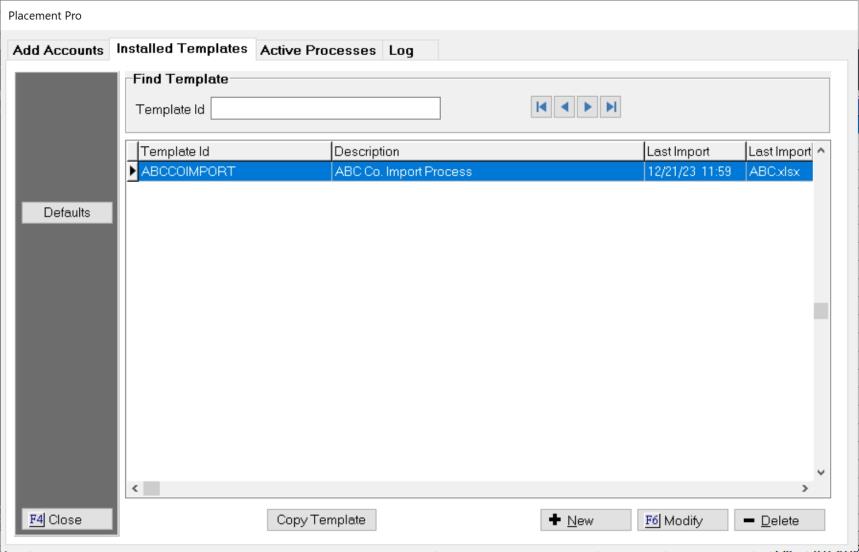
To Create/Import a Template, click the Installed Templates Tab.

A list of existing templates will be displayed. From here you can modify an existing template, create a new template from a sample file, copy an existing template or delete an existing template.
Placement Pro has a place to set Default Path to the import files and the backup files and reports allowing the firm to keep all template file locations in a uniform and widely accessible network location. In the Interface, click the  button to display the Placement Pro Default Setup Screen.
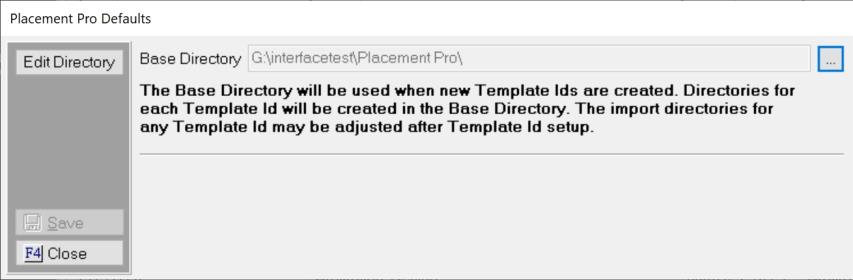
Click the  and select the location for the Placement Pro files and click Okay to select and Save to save the settings. All templates will add their import file locations to this directory automatically. You can override at the template level if needed.
To import an existing AIM template, click the  button at the bottom of the screen as if you were adding a completely new template. The Template Setup Screen will be displayed. From this screen, click the
  button to display the Placement Pro Import AIM Template Screen.
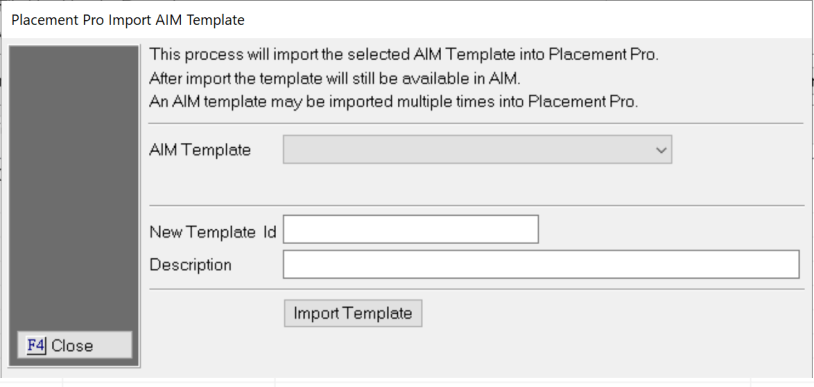
Select the AIM Template to move to Placement Pro from the drop down list. Give a new Template ID Code and Description for Placement Pro. IDs should not include spaces or special characters and maybe the same as the AIM Template.
Once complete, click the  button to import selected AIM Template as a Placement Pro Template.
Note: The import process will only import the Template items. All settings and translations must be setup in the new Placement Pro Templates
Before saving the template, be sure and set the template Options and Defaults, see below.
To add a new template, a sample or first file placement file is needed. From the Installed Templates Tab in the Interface,
Click the  button to display the Add Template Screen.

Template ID: Enter a Template a Code ID. This should be a code related to the file being imported with no spaces or special characters. For Example: ABCNEWPlacements
Description: Enter a Description that explains what this template will import. For Example: ABC Co. Placements
File Type: Select the format type of placement file to be received. The allowable types are Excel, CSV (Comma Delimited), Pipe Delimited or Tab Delimited. If unsure what type file you have, please contact Support.
File Has a Header: Does or will the placement file have a header? If so, check the File has a header check box.
Validate Header On Import: For future placement files with headers, the process can check the files headers against the template to insure they are exactly the same. If not the process will not import the file but instead it will create a report of any discrepancies. This option can help insure that file changes do not result in accounts with data in incorrect fields. If this option is needed, please check the Validate Header on Open check box.
Sample File: A sample of the placement file is required to setup the template, click the  button and browse to find the sample file. Once selected, click the okay button in the file browser.
Import File: Click the  button to import and populate the Template Map below.
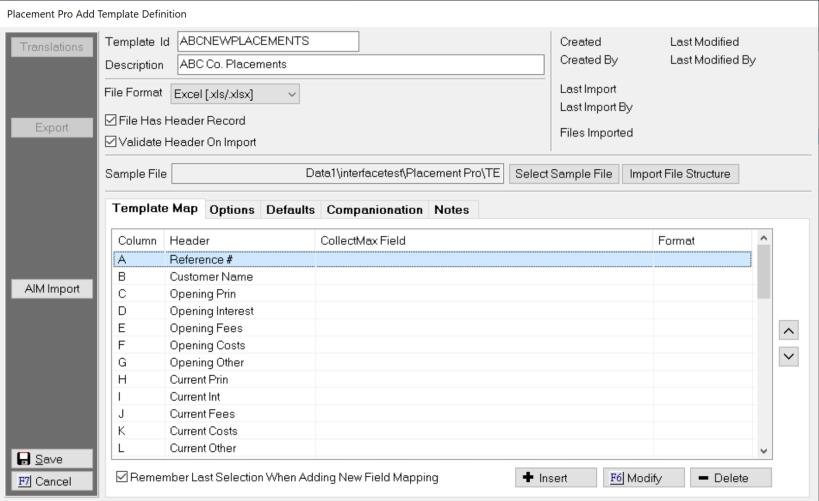
If the file has a header then, Header column on the screen will have the file header names. If the file has no header, then the first row of data will be imported in the Header column of the screen.
Remember Last Selection When Adding New Field Mapping: While defining the template fields, this option will remember the last screen and field last selected. It only works when defining new fields. This is a useful time saving tool especially on large placement files.
Begin defining each field/column in the template by selecting the field and clicking the  button. The Field Selection Screen will be displayed.
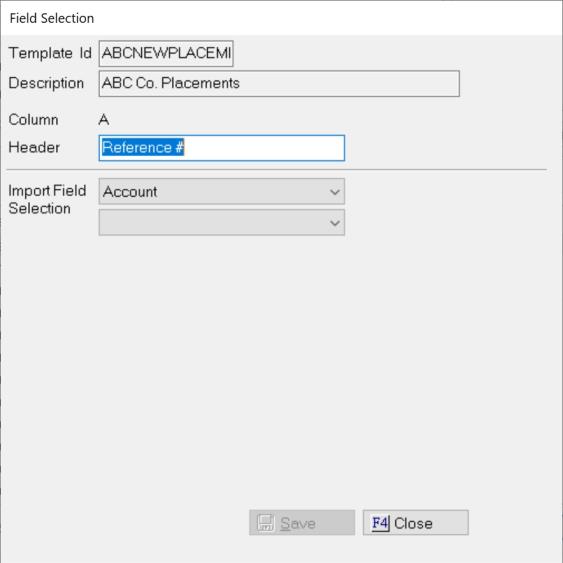
On this screen, select which field in CollectMax this column of data should be imported. To find the proper CollectMax fields, the field level will have to be selected first to get a list of the available fields for that level.
Account: If a column should be imported to a field on the summary tab or is an account level field or user field, then you will select Account. Examples of Account Level Fields are Other Account Number, Original Client, Client, Responsible Party or Payment Plans.
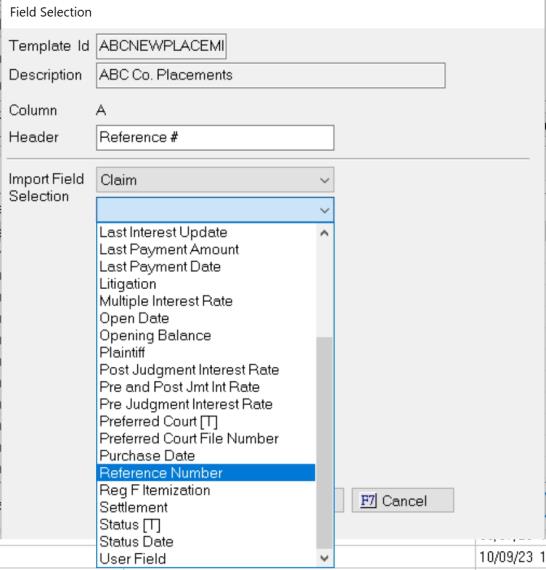
Claim: If a column should be iimported to a field on the Claim tab or is a claim level field or user field, then you will select Claim. Examples of Claim Level Fields are Reference Number, Preferred Court File Number, Court, Claim Balance, Interest Rates or Commission Rates.
Debtor: If a column should be imported to a field on the Debtor tab or is an debtor level field or user field, then you will select Debtor. Examples of Debtor Level Fields are Name, SSN, Phone Numbers, Addresses, Employers, Banks or Bankruptcy.
History: If a column should be in history on the history tab, then you will select History.
Skip: If a column should be skipped, select Skip. Placement Pro will automatically set all fields that are not defined as skipped when the template is saved. Thus, defining a field as skipped is not necessary.
Once the Field level, from the next field, select the field or field category.
Once the field for the column data is selected, click the save button and continue on to the next column and define it.
Some field selections are on screens under a level and require multiple drop downs to get the correct level and field, If you select field, that requires further definition, another drop down list will appear.
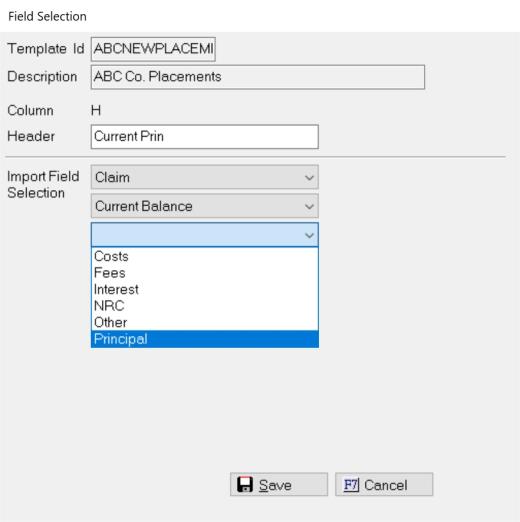
Continue until the proper field is found and save.
Additionally, some fields may require an ordinal be selected.
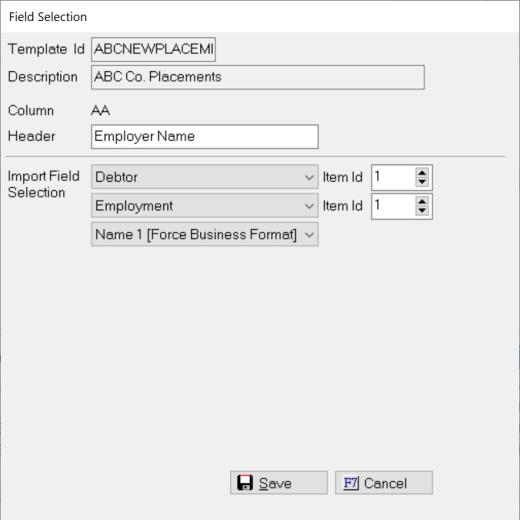
An ordinal helps tie different variables together for an entity such as a debtor or employer. There can be multiples of that entity attached to an account therefore the ordinal helps define which entity this column belongs.
In the example above you can have multiple fields for a debtor and have multiple debtors in a placement file. All Debtor Fields relating to the primary debtor should have a ordinal of 1. For example for the primary debtor you may have separate Columns for First Name, Middle Name, Last Name, Address Line 1, Phone number. You might also have the same fields for the co-debtor. To help the import keep them separate, you must code the primary debtor ordinal as 1 for all fields that go with the primary debtor and the co-debtor ordinal as 2 for all fields that go with the co-debtor.
Likewise you can have multiple employers that have multiple fields per debtor in each file like Name, Address and Phone Number. In this example your primary debtor (ordinal is 1) and the primary employer and all its related fields will have an ordinal of 1. If this was the primary debtor's second employer, then the debtor ordinal would be 1 and the employer ordinal would be 2. If this was the co-debtor’s, primary employer then the debtor ordinal would be 2 and the employer ordinal would be 1. Keep all the columns that are for that entity with the same ordinal.
Continue to define each field until the entire template has been defined or skipped.
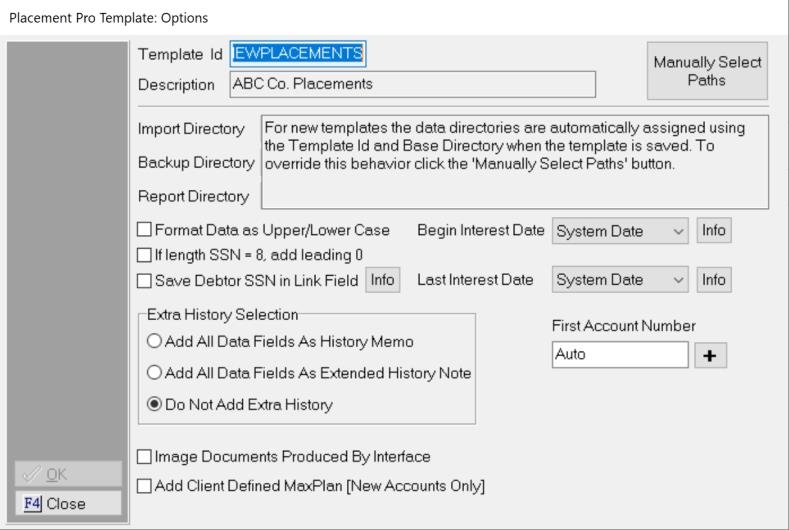
Once all has been defined, select the Options Tab.
This screen will display the options. Click the  to make changes to the options.
Directories: The Directories will be set in the Default Location set above. To manually override these options, click the  and the paths will appear to set manually by clicking the
  and browsing to the path and saving.
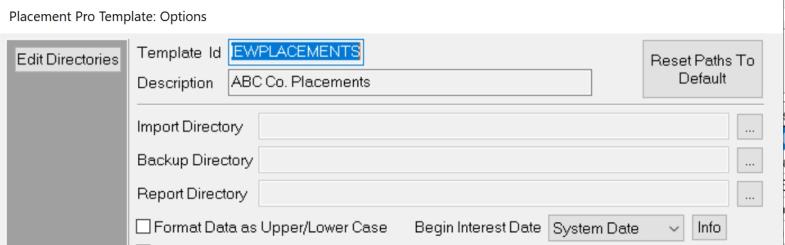
Click the  button to switch back to using the Default Paths.
Format Data Upper/Lower Case: If the forwarder sends data in all UPPERCASE and it should be imported as Proper Case, check this box.
If SSN Length = 8 Add Leading Zero: If the forwarder's accounts that have social security numbers that begin with zero, some file types will drop the leading zero. The process can add back a leading zero to any SSNs that are 8 in length. Check this box to add this option.
Save Debtor SSN in Link Field: To add the SSN to the linked field so that linking happen automatically, check this box.
Extra History Selection: Select the option for adding history.
All Data Fields in History Memo: To capture all columns of data for this account in history, select this option to import the data into a normal history note with the header name and field values for each column for the account in the placement file.
All Data Fields in Extended Memo: To capture all columns of data for this account,, select this option to import the data into an extended history note with the header name and field values for each column for the account in the placement file. This is recommended for imports with many columns if you are saving the data in history.
Do Not Add Extra History: If a copy of the data fields is not needed, select this option and no history will be added.
Image Documents Produced by Interface: To image the documents you set to be added to the print list when you import the new placement, check this box.
Add Client Defined MaxPlans: To have a MaxPlan added to new placements, check this box to pull the MaxPlan from the CollectMax Client Debtor PreSets options
Begin Interest Date: If the file doesn't have a begin interest rate column, select from one of a few dates for the begin interest date: System Date (Download Date), Charge Off Date, Contract Date, Last Payment Date, Open Date. A begin interest rate is required.
Last Interest Date: If the file doesn't have a last interest rate column, select from one of a few dates for the last interest date: System Date (Download Date), Charge Off Date, Contract Date, Last Payment Date, Open Date. A last interest rate is required.
First Account Number: To select the account number to start with, enter an account number in this field. Otherwise, the account numbers will start with next highest account number.
Once all settings are set, click okay.
Back on the Add Template screen, click on the Defaults Tab to display the import defaults.
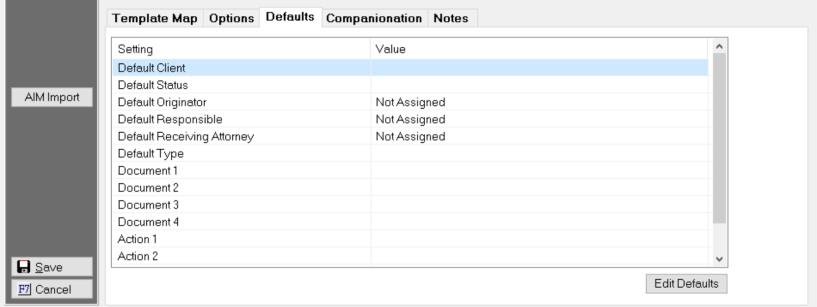
This will display the set import defaults for this template. Click the  button to set or update the defaults.
These settings will be used to import the accounts. These settings will be stored with the template settings and cannot be set on the import screen.
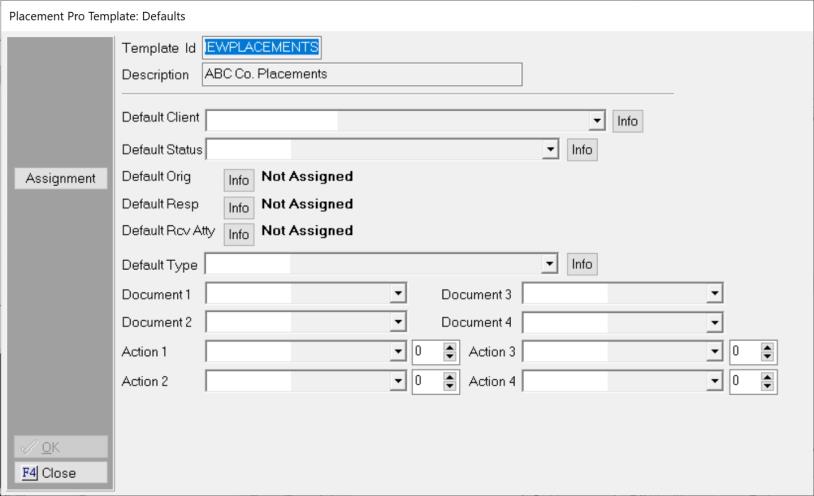
Default Client: If the accounts in the template will be added to a single client, select that client from the drop down list. If the template has multiple clients to be translated into a CollectMax client, a default client will still be required in the event the forwarder does not fill in the translated client field on every row. Templates cannot be saved until a default client is selected.
Default Status: If the accounts in the template do not have a status column, select the opening status for all imported accounts. If your template does have a status column, a default status will still be required in the event your forwarder does not send a status on one or more accounts.
Default Originator, Responsible and Receiving Attorney: If the file does not have an Originator, Responsible and/or Receiving Attorney, they can be set under the  button. Choose from a single code, a round robin of multiple entities, an entity per balance range or an entity per name range. If the file has columns for one or all of these entities, you can set a default in the event your forwarder fails to send a code on one or more accounts. If there is not default set, any accounts that do not have an originator, responsible and/or receiving attorney will be imported without those entities.
Default Type: If the file does not have a type column, a default type can be set to all to all imported placements. If the file has a column for type, the default type will be added on the account in the event the forwarder fails to send a type on one or more accounts.
Documents: Select up to 4 Master documents to be generated to the associated print list when an account is added in the placement import.
Actions: Select up to 4 Action and corresponding delay days to be added to the account when it is added by the placement import.
Once all import default settings have been set, click the Okay button.
Note: You will not be prompted to set or override these setting on import. These selections must be set at the template import defaults level.
Save the template and use it to import accounts.
Note: Please note a Default Client and Status must be set before a template can be saved. Failure to set one will prompt a pop-up message to remind you if you hit the template save button. If you skip selection of a default client after the pop-up, the template will not be saved.
Placement Pro allows for some simple companionation rules. Companionation is combining multiple rows of placements into a single account with multiple claims or adding claims to an existing account in CollectMax. These accounts/claims must have the same debtor and client to be companionated. Companionation is used mostly for retail accounts where a debtor may have multiple debts such as doctors bills, hospital bills, student loans, utility bills, tax bills or traffic fines.
If your forwarder sends multiple accounts for the same debtor and you would like them to be combined into a single account with multiple claims, then companionation might be right for your template.
Note: Some companionation rules can be quite complicated and the simple rules in Placement Pro will not meet the needs for this template. JST can consider customizing companionation rules. Provide the rules and we will research the rule and what the development time and charges might be to add the new rule. Please contact, Sales or Technical Support for more information.
From the Add Template screen for the template that needs to companionate, please click the companionation tab.
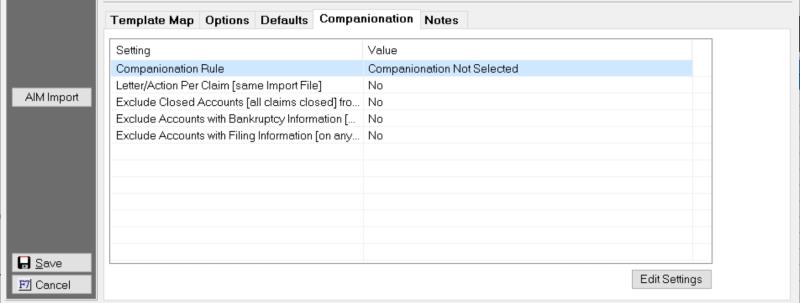
This screen will display any Companionation Settings currently set on the template. Click the  button to add or modify the Companionation settings.
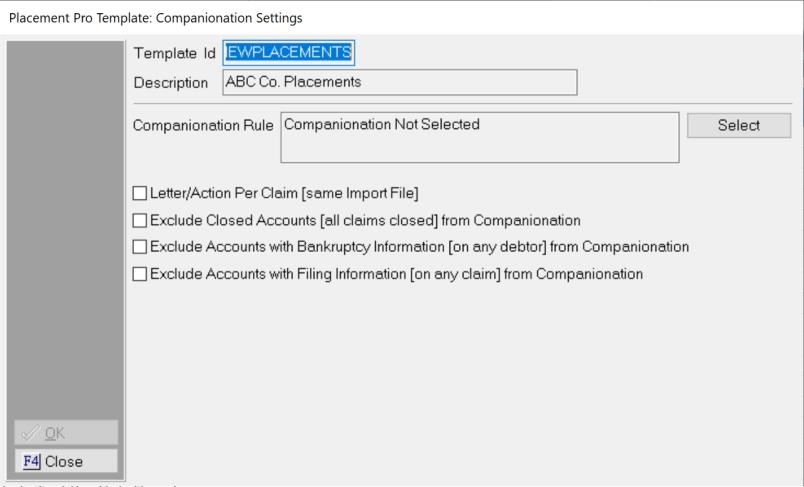
Companionation Rule: Click the select button to pick the Rule needed.
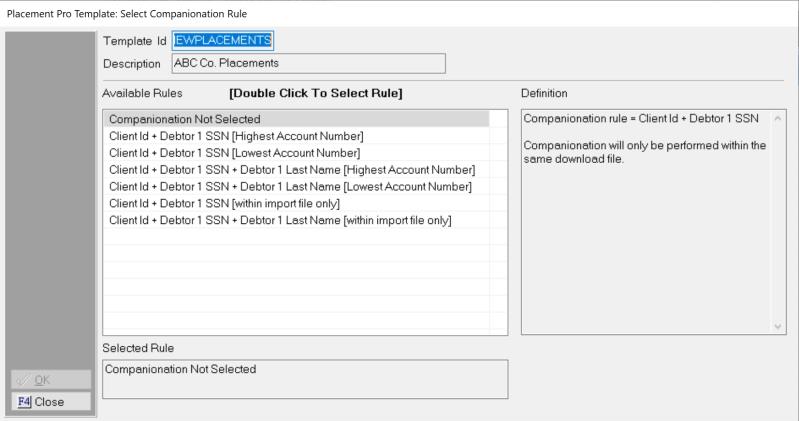
Pick the rule that will best combine placement accounts into an account with claims and/or add new claims to existing accounts. Each rule has an explanation in the Definitions box.
Companionation Not Selected: This template has no companionation rule selected. Use this if you do not want companionation.
Client ID + Debtor 1 SSN [Highest Account Number]: The Placement Pro process will scan the file to determine the primary debtor's social security number and the client it will be added to in CollectMax. It will compare all accounts under the matching CollectMax Client to see if there is an account or accounts with the same primary debtor social security number. If it finds one match and there are no exclusions, the placement will be added as a new claim to that account. If more than one match is found and there are no exclusions, the placement will be added to the highest account number in CollectMax which is typically the newest account.
Client ID + Debtor 1 SSN [Lowest Account Number]: The Placement Pro process will scan the file to determine the primary debtor's social security number and the client it will be added to in CollectMax. It will compare all accounts under the matching CollectMax Client to see if there is an account or accounts with the same primary debtor social security number. If it finds one match and there are no exclusions, the placement will be added as a new claim to that account. If more than one match is found and there are no exclusions, the placement will be added as a new claim to the lowest account number in CollectMax which is typically the oldest account.
Client ID + Debtor 1 SSN + Debtor 1 Last Name [Highest Account Number]:The Placement Pro process will scan the file to determine the primary debtor's social security number, the primary debtor's last name and the client it will be added to in CollectMax. It will compare all accounts under the matching CollectMax Client to see if there is an account or accounts with the same primary debtor social security number and primary debtor last name. If it finds one match and there are no exclusions, the placement will be added as a new claim to that account. If more than one match is found and there are no exclusions, the placement will be added as a new claim to the highest account number in CollectMax which is typically the newest account.
Client ID + Debtor 1 SSN + Debtor 1 Last Name [Lowest Account Number]:The Placement Pro process will scan the file to determine the primary debtor's social security number, the primary debtor's last name and the client it will be added to in CollectMax. It will compare all accounts under the matching CollectMax Client to see if there is an account or accounts with the same primary debtor social security number and primary debtor last name. If it finds one match and there are no exclusions, the placement will be added as a new claim to that account. If more than one match is found and there are no exclusions, the placement will be added as a new claim to the lowest account number in CollectMax which is typically the oldest account.
Client ID + Debtor 1 SSN [within import file only]:The Placement Pro process will scan the file to see if there are any rows within the file with the same client and primary debtor social security number. If so it will combine all matches together into one account with multiple claims. The debtor demographic information will be used from the first row of the combined claims in the file. This option does not seek to find matching accounts in CollectMax and will add a new account even if there is match in CollectMax.
Client ID + Debtor 1 SSN + Debtor 1 Last Name [with import file only]:The Placement Pro process will scan the file to see if there are any rows within the file with the same client and primary debtor social security number and primary debtor last name. If so it will combine all matches together into one account with multiple claims. The debtor demographic information will be used from the first row of the combined claims in the file. This option does not seek to find matching accounts in CollectMax and will add a new account even if there is match in CollectMax.
If an account cannot be found that matches the selected rule exactly, a new account will be added.
Once the rule is selected, click OK to go back to the Companionation Settings.
Letter/Action Per Claim [same Import File]:Selecting this option will add a letter/action per claim added to an account instead of one letter/action per account.
Exclude Closed Accounts: This option will not allow any new claims to be added to an account with all claims closed. If no other account is found to match, a new account will be added.
Exclude Accounts with Bankruptcy Information: This option will not allow any new claims to be added to an account that has Bankrupcty Information added on any debtor attached to the account. If no other account is found to match, a new account will be added.
Exclude Account with Filing Information: This option will not allow any new claims to be added to an account that has Filing information added on any debtor attached to the account. If no other account is found to match, a new account will be added.
To enter notes about the template, click the Notes tab and enter the notes.
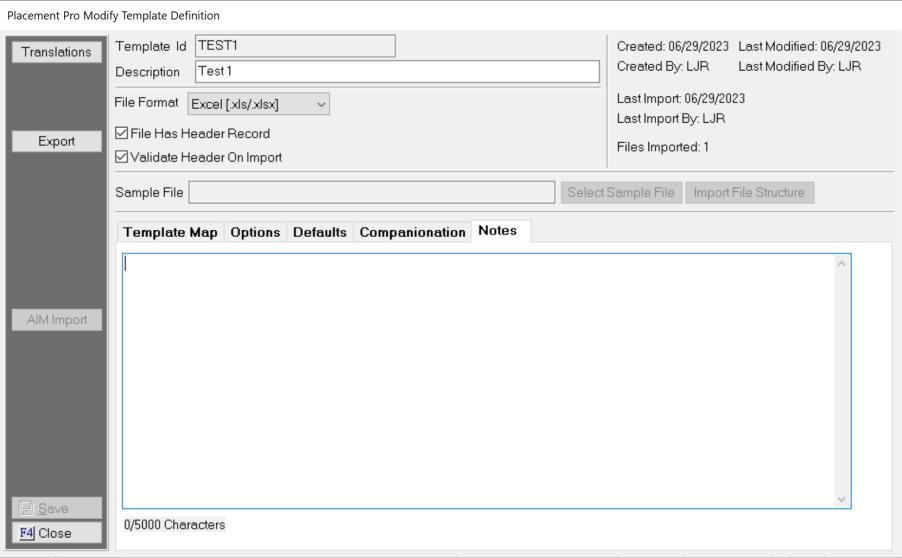
Once you are finished setting up the template, click the  button to save the template.
After the template has been setup and saved, you can use the template to import accounts.
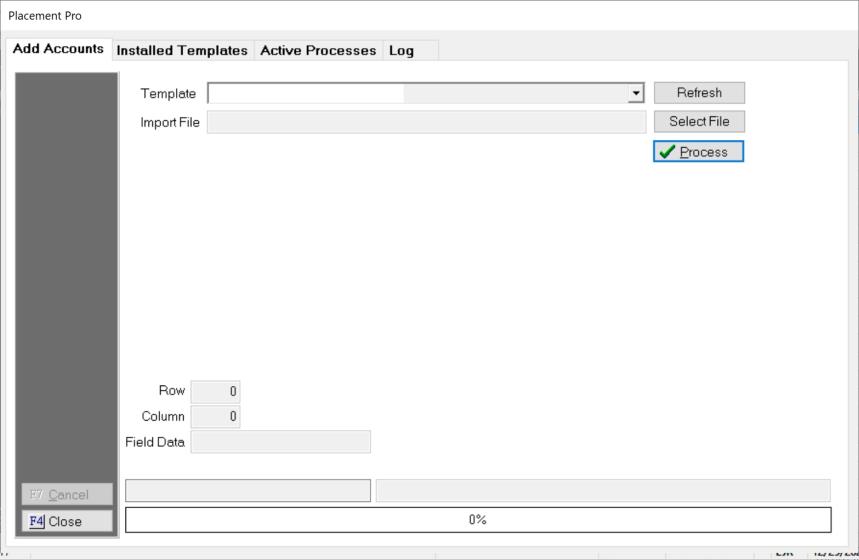
On the Add Accounts Tab of the Interface, select the template you need for your import file from the drop down list, then select the import file by clicking the Select File button and browsing to the file. Once selected process the file.
The process will start the import of accounts. You will get a preview report.
If you have your template set to compare headers and the template does not match the file, the process will create a report letting you know which headers do not match giving you a change to modify you template, or file.
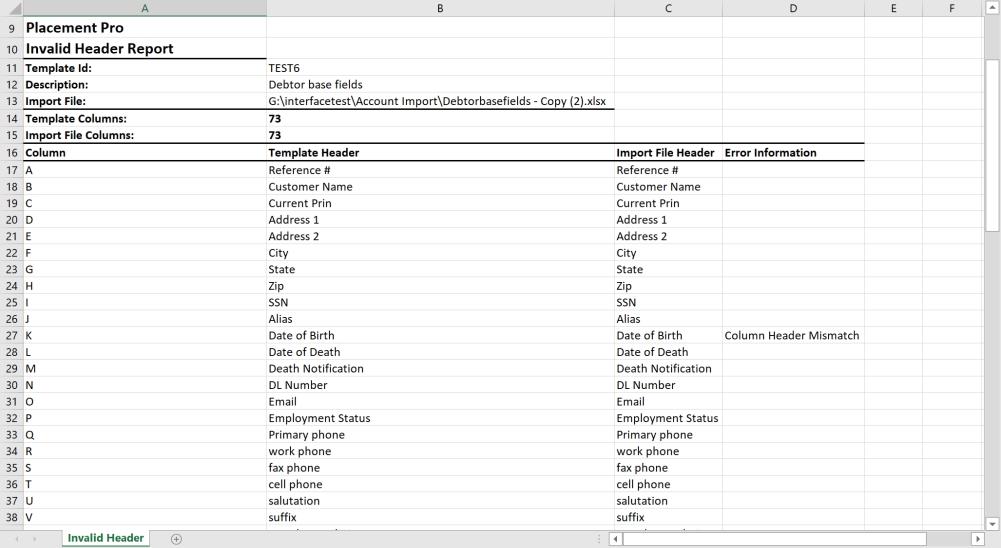
The placement file is different than the template, this could indicate the forwarder is sending additional data or has removed some data. Either modify the template to make the new files or edit the placement file to match the template.
If the file has an translations, the process will populate the transaction tables and will alert you to define them. On the Template tab, find the template in the list, highlight and click Modify.
Click the ![]() button to display the translation table. The process will automatically fill in any codes that are the same as what is used in the filed for example if the code is ABC and an there is an ABC in CollectMax it will automatically define it. Review any automatic translations for accuracy and define any translations without a definition.
button to display the translation table. The process will automatically fill in any codes that are the same as what is used in the filed for example if the code is ABC and an there is an ABC in CollectMax it will automatically define it. Review any automatic translations for accuracy and define any translations without a definition.
![]()
Highlight the code to be defined or modified, click and display the translation screen.
![]()
Select the translation from the drop down list and click Save.
Continue until all translations are defined.
Note: All Translations must be defined to import placements. Continue until all translations are defined or edit the placement file to remove the code.
Code Translation can be set at the time you setup your template. From the Installed Templates tab, find your template, highlight and click modify. Click the ![]() button to display Translation Screen. Click the
button to display Translation Screen. Click the button to display the Add Translation screen.
![]()
Translation Type: Select from the drop down list the type of code you are defining. For Example: Court, Status, Account Type, Action Code
Translation Data: Enter the placement file data that is being translated into a CollectMax code.
Code: Select from the drop down the CollectMax Code that should be imported for this Translation Data.
Save and continue to add all translation or allow the import process to add them as above.
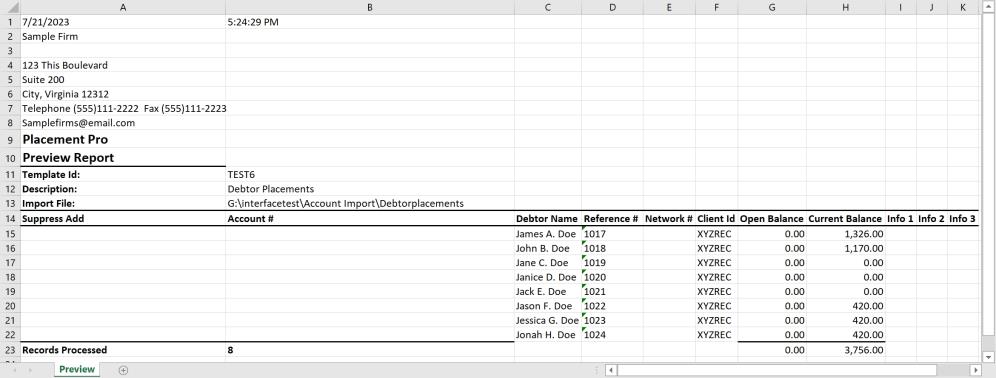
Once the preview is complete, say yes to imported the files. Once the files are imported, the process will create a Report in the template location. Final Reports should be reviewed for accounts that have been suppressed from downloading or accounts that need reviewed.
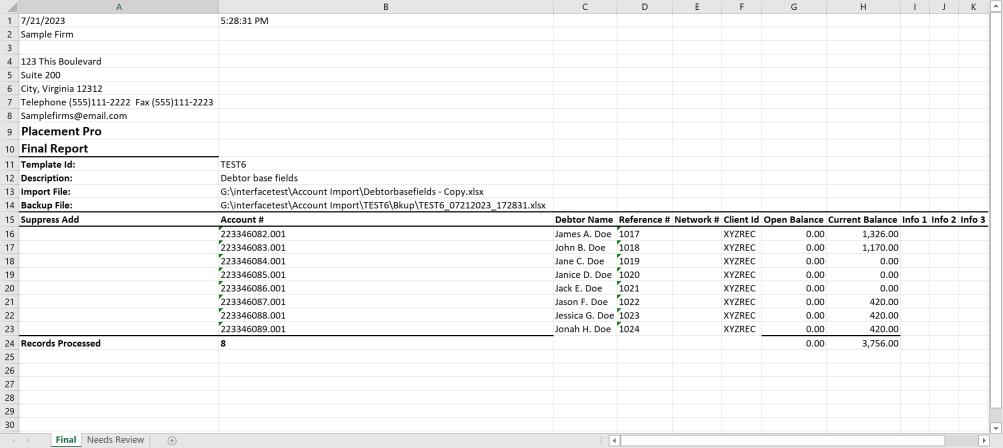
The final report will list all the accounts or claims added with the Account Numbers, Primary Debtor Names, Reference Number, Network Number, Client ID and Balances. If an account is listed with a YES under the Suppress Add Column, the account has not be imported and will have to be added manually or be fixed and put into a new placement file to import. Suppressed account could be due to duplicate accounts in the system or incomplete data to import.
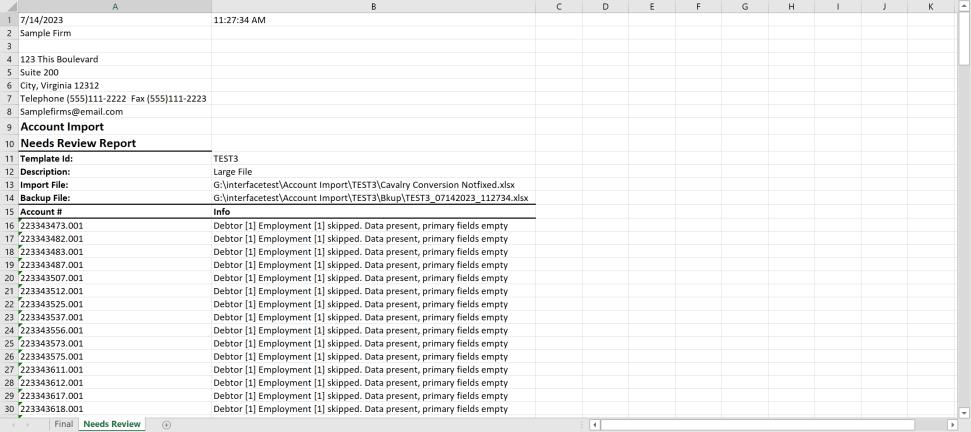
Any accounts with issues, will be listed on the Needs Review Tab of the Final Report. This report may list reasons an account/claim was not imported or data fields that were unable to be imported even if the account was downloaded.
Note: JST recommends that the Final Report is reviewed after each placement file import, to insure no data is missed.
After reviewing the report and fixing any issues, the placement files will be ready to participate in the firm workflow.
On the Active Processes Tab, you will see all templates in currently in process or being updated. This can be used to understand why you may not be able to update or use a template or gauge when would be the best time to start a importing accounts.

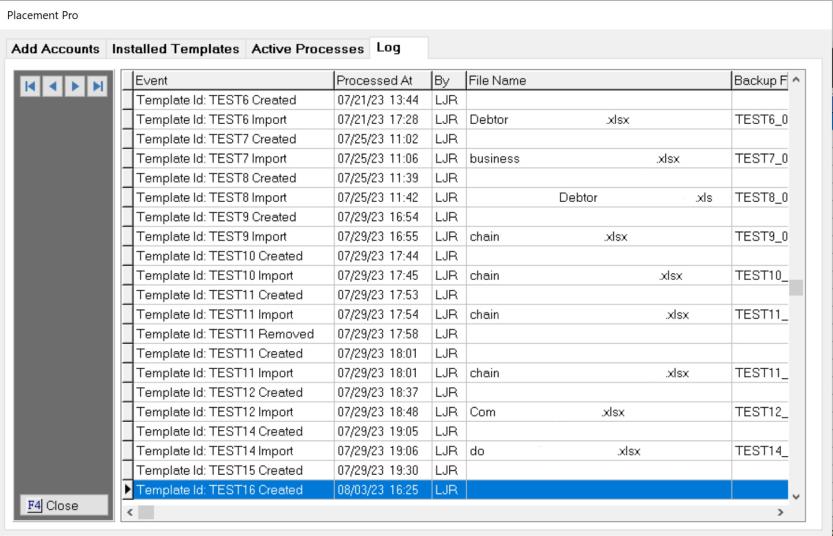
The log tab will list all templates created, removed or processed along with the operators initials and times. For those templates that are processed, it will also list the file name and the backup file name.
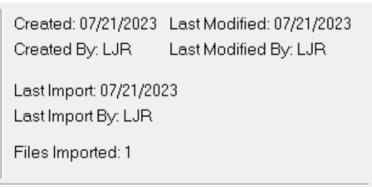
A few statistics are tracked when a template is processed. From the Installed Template Screen, select a template to view the statistics, highlight and click modify. In the upper right corner, there will be some simple statistics
Any template settings and fields can be exported to an excel report. From the template, click the  button to export the template to a report that will be saved in the RPT directory for this template.
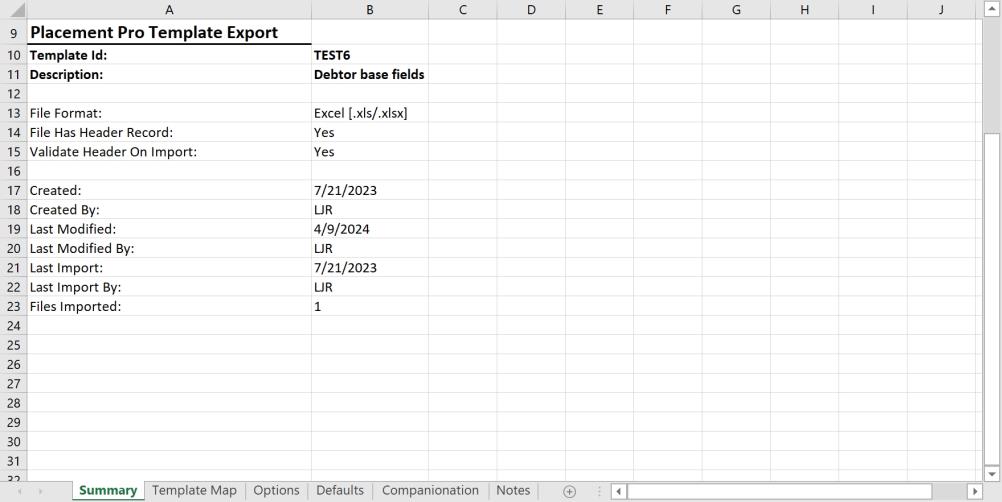
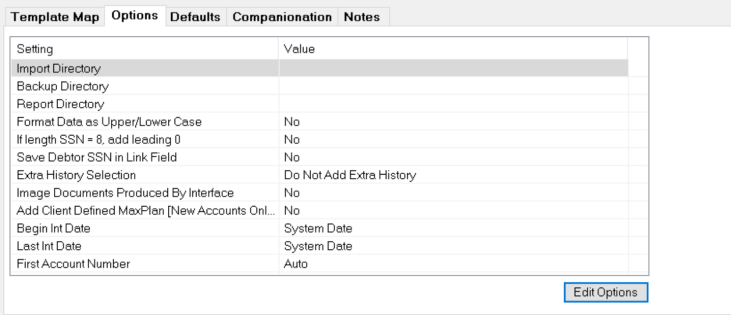
Summary: This tab will list the template Name and Statistics
Template Map: This tab will list all the columns and the CollectMax Locations.
Options: This table will list all the template Options
Defaults: This tab will list all the template defaults
Companionation: This tab will list the Companionation rules for this template.
Notes: This tab will list all the notes added to the template.
As the number of templates grow, scrolling to find the template can become time consuming. Placement Pro allows you search for a template by Template by ID.

Enter a Template ID and you can select what it finds or you can arrow back and forth through the templates by ID.
Templates can be modified once saved by going to the Installed Templates tab, finding the Template and clicking the  button. From there you can modify the Options, Defaults, Companionation Rules, Notes and any Template column. Just select what you need and click the modify or edit buttons and make the changes. Click the save button to save the changes.
Templates can be deleted once saved by going to the Installed Templates tab, finding the template, highlighting and clicking the  button. A confirmation will be displayed. Deletion will remove the template completely. There is no undo for a deleted template.